Warning (even if these risks are low, you must be informed)
–The use of a laser can be dangerous, you must take all measures to protect your eyes by using glasses suitable for the type of laser used and be alone in the room where the laser is on.
–Depending on the materials in contact with the laser there may be very toxic fumes, avoid engraving on materials without first inquiring. The room must be ventilated in all cases.
–As you know, laser burns material, so there is a risk of fire during the job, do not leave the machine unattended.
–Do not try to burn reflective material which could deflect the beam anywhere.
What can we do with this type of laser?
This type of diode laser can only cut thin layers of plywood, balsa, cork, paper, cardboard … with several slow passes, it’s not really made to cut.
It is basically designed for engraving, even for the most powerful diode models.
If you want a real laser cutter, you have to invest in a CO2 laser! (Machine dedicated to that, not the same budget!)
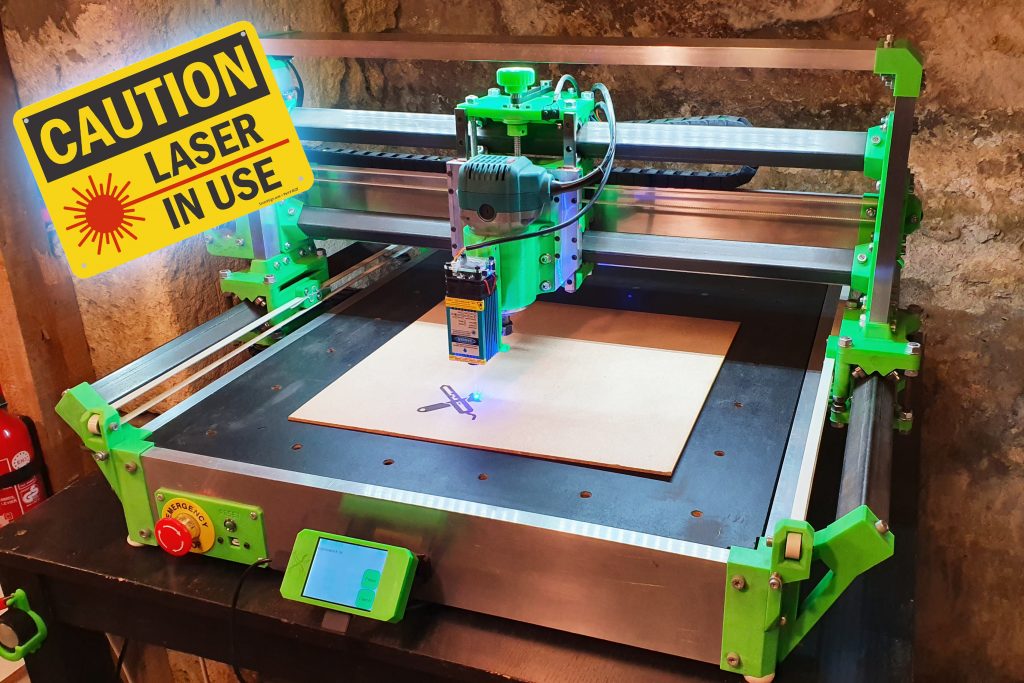
Hardware :
A laser module : Attention, some sellers play on the words, some are sold for 15w, in fact it is the electric consumption, not the power of the laser! The two links below are good value for money and tested by the members of the forum and i.
A 12v 6A minimum power supply
A printable laser module holder for RS-CNC32:
V1.0/1.5 Wiring diagram
- Don’t need shielded wires
- Use wire sections similar to those supplied with the laser
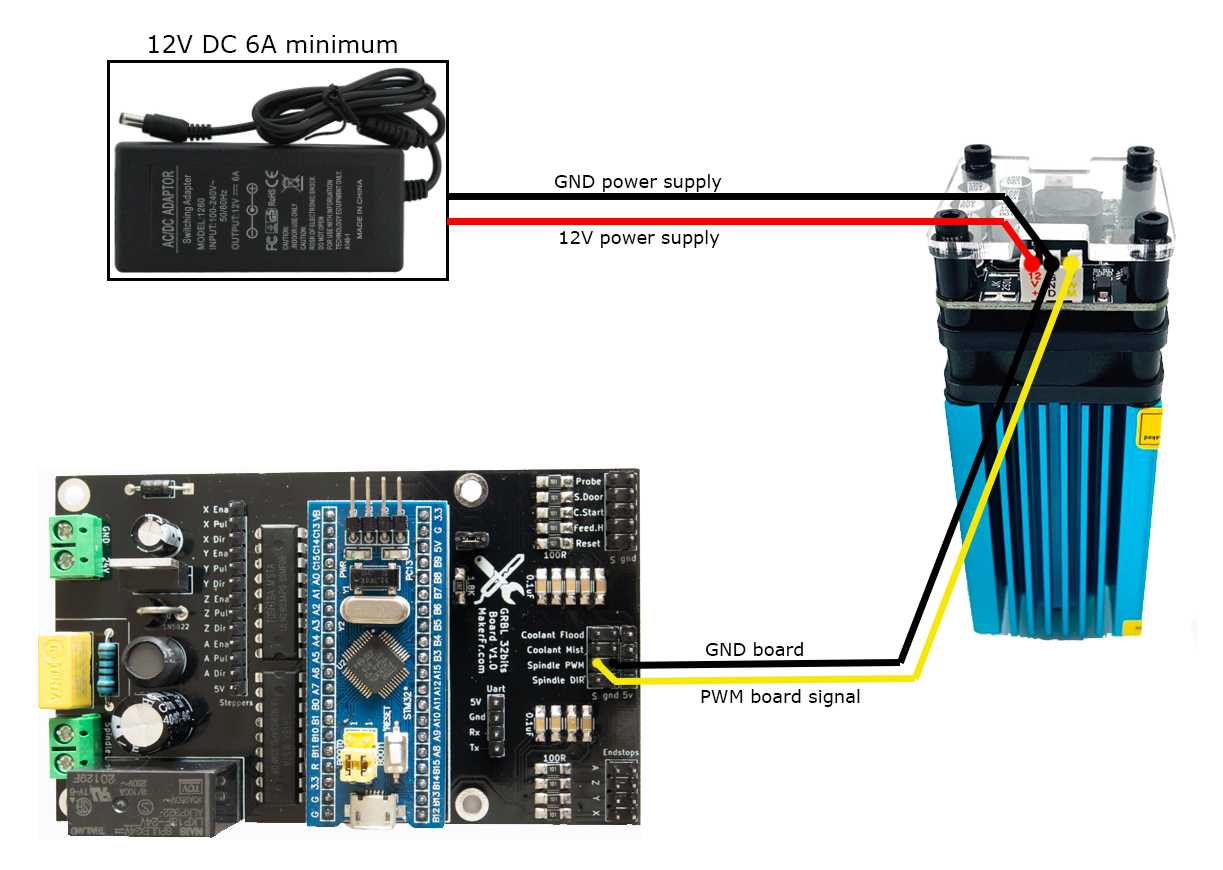
GRBL Firmware (V1.0/1.5)
If your GRBL firmware (on the STM32) is older than January 15, 2020, you must update it, because firmware has been optimized for use of laser:
Once update done, launch command $RST=$ so that all the new parameters are activated (if you had customized parameters via GRBL commands, you’ll have to do it again)
GRBL 32bits board V2.0 Wiring
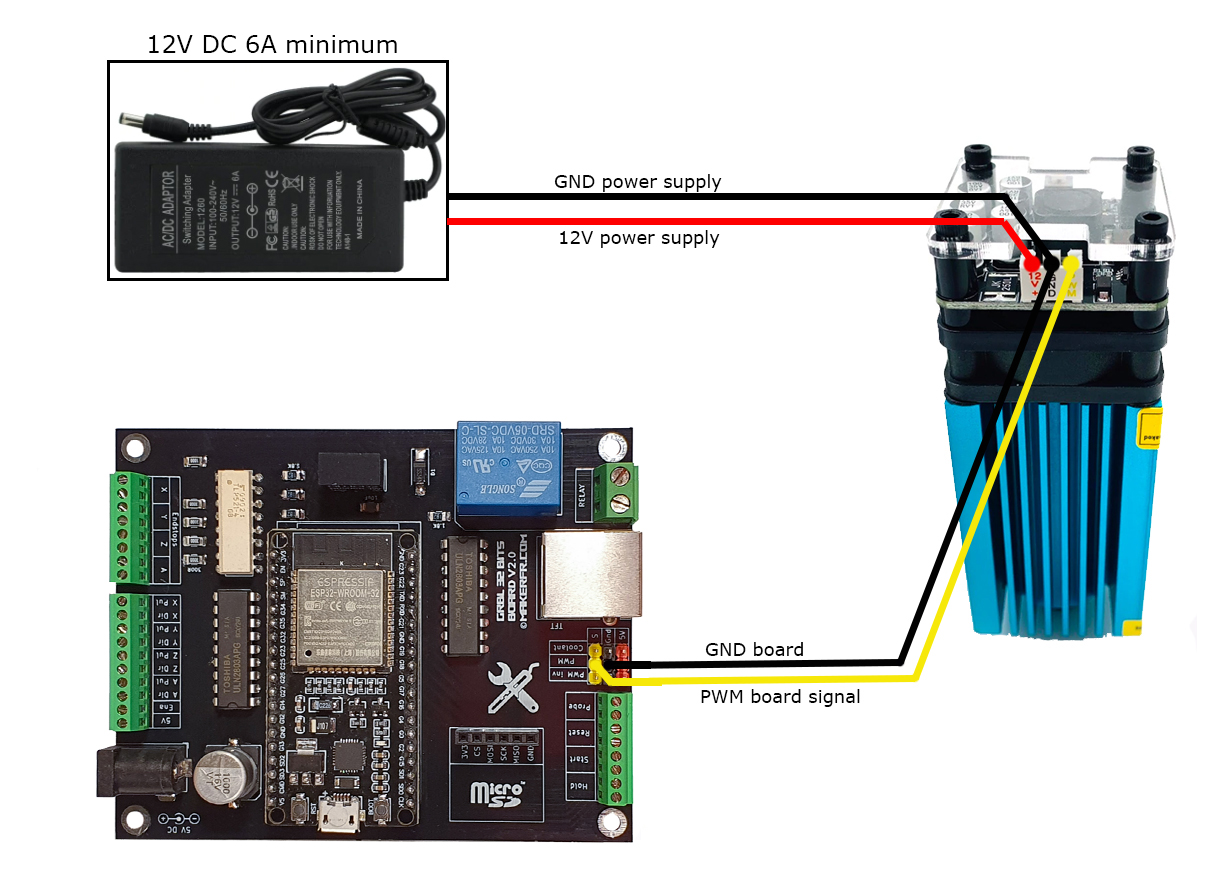
- On the V2.0 board, the laser mode is only activated via the command $Spindle/Type=Laser (otherwise the M4 S *** command will not work)
- To return to milling mode, send the command $Spindle/Type=PWM
- You can create personalized buttons on the TFT to activate the laser mode and the spindle mode (see TFT user manual page)
Focal adjustment
Adjusting the focal length is essential to get the best out of your laser. Two possibilities:
–If your laser does not have an adjustment ring at the level of the lens, it was delivered with a shim, it is just necessary by manually adjusting the height of Z axis, come to stop the lens on the shim placed on the material to be engraved.
–If your laser has an adjustment ring at the level of the lens, there are different ways to adjust the focal, I proceeded like this:
- Using a rule or a homemade shim, adjust height of the lens relative to the material to be engraved (I chose 40mm, but you can choose another height)
- Start an engraving job
- Pause the job via the TFT (the laser turns off when it is paused)
- Turn the lens wheel a little
- Relaunch the job, and pause to see the change in color
- Repeat the operation until the darkest engraving is obtained
- Once the optimal focal length is obtained, you no longer touch the lens setting, you just have to put the laser at the right height in relation to the part to be engraved for each job.
Example of preparing an engraving file
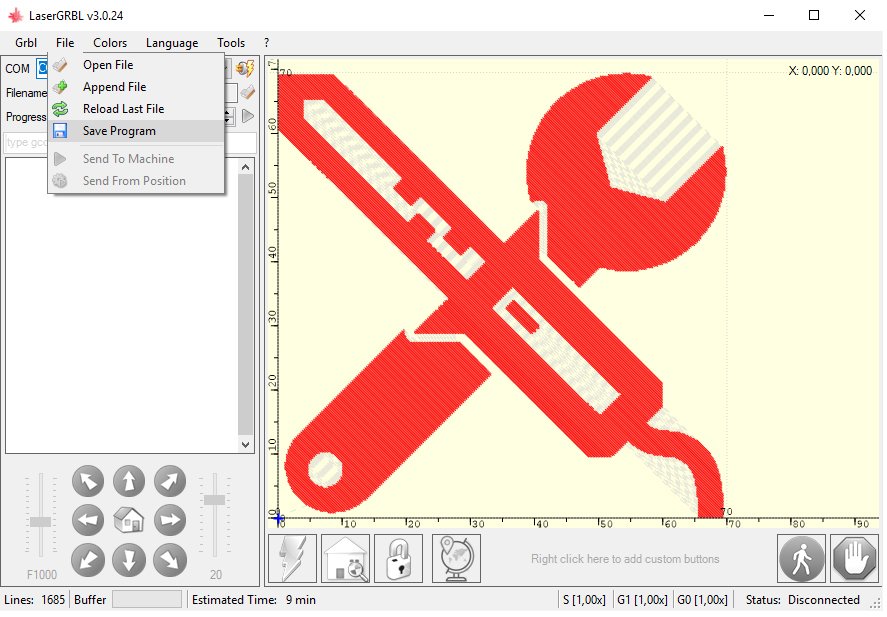
There is a lot of software for this use, here I show you an example with free software, open source and very simple to use: LaserGRBL
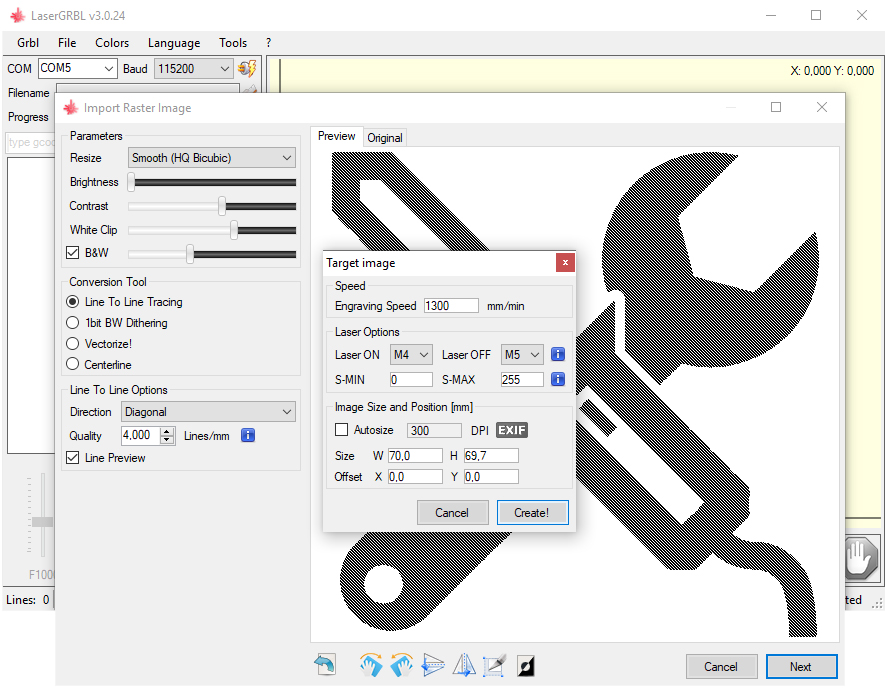
Once LaserGRBL downloaded and installed, open it:
- Open an image file (it can be a photo) File> Open a file
- On this tab, you can adjust the brightness, contrast, ect.
- Then choose “line by line” and “diagonal”
- You can choose the definition by the number of lines per millimeter, obviously, the more you put, longer it will take to engrave
- Then click on “Next” at the bottom right.

Here we will adjust engraving parameters
-
For the speed, I put 1300mm / min to engrave with my 5.5w on MDF, speed will be different depending on the power of your laser and type or color of material to be engraved.
- Laser On, we put “M4”, laser OFF “M5”, S-MIN “0”, S-MAX “255”
- Then you adjust the size of your image to be engraved.
- And click on “Create” button
All you have to do is get your file
- File> Save program
- Put the .nc file obtained on your SD card and put it in the TFT of your CNC!
Laser use
Note: laser mode in GRBL must be activated to engrave ($ 32 = 1) It’s activated by default in the latest firmware, but check your configuration with $$ command.
Note2: Router/spindle switch must be turned off !
- Adjust height of your laser in relation to the material to be engraved and put it at the point of origin XY
- Turn on the machine and only then turn on the laser (with switch integrated on laser module)
- Check on TFT info screen that the 3 axes are indeed at 0 (otherwise press the button Set 0 XYZ)
- Put on your laser protective glasses
- On the TFT, go to Mill> SD> your file and go!
- Once job is finished, first turn off laser before turning off the CNC !
If you have technical questions, please use only forum board (international English section)
Comments are reserved for information … or congratulations 😀
Thanks and good job folks !
Romaker
Chapeau bas excellent travail.
Merci pour l’avertissement sur la puissance des lasers, je me serais surement fait avoir, ma cnc est terminé et je commencer a regardé pour l’équipé de ce système, je cherchais sur 20w bleu, c’est le max que j’ai trouvé, mai je me demande maitenant si c’est juste, à prospecter donc.
Merci Thierry,
Je ne suis pas un expert en gravure laser, mais suite à la demande, je m’y suis mis, j’ai trouvé ça cool, et je partage en tuto 😉
Bonne soirée
Romain
Bonjour il y a des 30W sur Ali express
Bonsoir Romain
Comme d’habitude très joli travail !!!!
Est il possible de l’adapter sur la RS-CNC ?
Merci d’avance.
Bonsoir Philippe,
Hélas ça ne fonctionne qu’à partir du kit GRBL32bits.
Merci pour les compliments 🙂
Bonne soirée
Romain
Génial !
Je commande et je suis déjà impatient .
Merci Romain cette CNC est une de mes plus belles histoires et ça épate tout mon entourage 🙂 🙂
Merci Sam !
Content que tu te régales !
Romain
Tout d’abord un grand merci pour ce projet, j’ai cherché un bon moment une CNC diy. Et voilà la machine rêvée !!
Chapeau bas pour tout le travail fourni et pour l’accueil.
Je suis en train de préparer ma commande pour cette machine. Juste une petite question : y a t’il vraiment une différence entre les 2 lasers proposé ? Car le tarif est du simple au double, la puissance est elle en rapport avec le tarif ?
Merci d’avance
Bonjour Thomas,
Merci pour les encouragements 🙂
Oui pour les lasers c’est la puissance qui fait le prix, j’ai prit le 5.5w, il va très bien pour la gravure.
Bonne journée
Romain
Bonsoir
Serait il possible de decoupe du balsa 2 mm ou du ctp
Merci de vote reponse
Bonsoir Venec,
Je n’ai pas essayé, mais avec le laser 15w, en plusieurs passes, ça doit bien se couper !
Romain
Encore Merci Romain !!
Je l’ai installé et ça fonctionne du tonnerre !!!
Super, Amuses toi bien 😉
Bonjour,
J’ai un petit souci avec mon laser, il ne s’allume jamais avec un gcode, par contre il s’allume plein pot lorsque je débranche le ground. Mon gcode est fait avec LaserGrbl.
J’ai vérifié si le PWM était bien envoyé avec un analyseur logique, j’ai bien les “pulses”. Je cherche donc des idées.
Bonjour Sylvain, pour les questions techniques, ça se passe sur le forum, ce sera plus pratique pour tout le monde !
Merci !
Bonjour,
Quelles solutions existe-t’il sur Mac, LaserGRBL n’étant développé que sur PC?
Merci
Bonjour,
N’ayant pas de mac, je ne peux pas vous renseigner !
Il faudrait poser la question sur le forum.
Bonne soirée
Romain
Merci quand même!
Je travaille sur Mac et j’utilise LaserWeb qui fait bien le taf.
Et comme son nom ne l’indique pas, tu peux également l’utiliser pour le fraisage traditionnel.
Rien n’est perdu pour les Mac 😀
Bonsoir,
Merci pour le tuto.
Le branchement gnd sur le carte est-il primordial ?
Cela fonctionne en ne branchant que au gnd de l’alimentation ?
Merci pour la réponse
Hello, si c’est sur une masse commune, pas de soucis!
Romain
Merci pour ta réponse.
Dans mon cas le gnd de l’alimentation et celle de du Shield sont différents.
Ce qui fait que dès que la carte est alimenté, le ventilo du laser se met en route également….
Donc il faut bien que je branche sur les 2 pour que le pwm fonctionne correctement…. Non ?
Il faut tout simplement que ça corresponde au schéma du tuto, que le GND de l’alim 12V soit relié au GND de l’alim 24V
Bonjour, j’y connais rien en laser, est-ce que le 14w peut faire le meme travail que le 7w, ou est il vraiment specialisé plus pour la découpe?
Merci pour le travail que tu fourni.
Bonjour Sébastien,
Alors pour les lasers diodes, le nombre de watts est vraiment pas fiable, on peut même trouver des lasers 5w plus puissants que des 12w… donc bon… faut pas trp se fier aux watts ^^
Dans tous les cas, comme je le dis dans le tuto, les lasers diodes sont faits pour la gravure, pas pour la découpe… à part peut être pour du papier ou du carton !
Romain
Romain, sauf erreur de ma part le 15w du lien est en fait un 8w .. une grosse difference avec le 5.5w a l’usage ? permet il plus de chose comme de la decoupe mince ? merci
super votre taf en passant 🙂
Bonjour Guillaume,
Ha c’est bien que le vendeur ait eu l’honnêteté de dire que c’était 8w en moyenne, car comme je le dis dans le tuto, tous les lasers Chinois jouent sur les mots et que 12W n’est pas la puissance continue du laser, d’ailleurs quand je vois qu’ils vendent maintenant des 40W à diode, je me marre bien, c’est à celui qui aura la plus grosse… mauvaise foix 😀
Pour en revenir à ta question sur les capacités, j’ai le 5.5w de la liste, pas le 12W, donc je ne peux pas te dire exactement, mais ce qui est sûr, c’est qu’un laser diode ne coupera pas plus qu’une mince couche de balsa ou de carton, peut être du CP en peuplier de 3mm en plusieurs passes… à ce moment là, autant se le faire en une seule passe de 1000mm/min à la fraiseuse ^^
Perso, je ne me sers du laser que pour la gravure, pour imprimer des motifs sur la matière, j’ai même pas essayé de couper car c’est ridicule, surtout quand on a vu une vraie machine de découpe laser de qualité au Co2 fonctionner, ça te calme direct avec ton laser diode ^^
Romain
Bonjour , petite question si j’utilise ma cnc avec un pc , est-ce que ca marche de la meme facon ?
Merci
Oui bien sûr, LaserGRBL fonctionne direct via USB
Romain
Bonjour a tous
je suis nouveau sur le forum ,j’ai lu l’article sur Monter un laser avec la carte GRBL32bits et j’ai apprit comment connecter mon laser
question avec ce raccordement ,comme dans l’article la puissance du laser varie automatiquement en fonction des code g-code du fichier a graver, a fin d’avoir les nuances de gris
merci d’avance et bonne fêtes
Guy
Bonjour Guy,
Quelle est la question ?