Installing the firmware on the MKS Base
- Download the Arduino IDE software and install it.
- Download Marlin firmware for I3 RS
- Unzip it and open it by clicking Marlin-I3RS> Marlin> Marlin.ino
- Connect the MKS Base 1.5 to a USB port on your computer, and verify that it is detected, otherwise download the driver.
- Then, in the Arduino software, go to Tools> board type and select “Mega 2560”
- Then Tools> Port, and select the port of your card.
- Upload the firmware by clicking
 . This may take a little while.
TFT screen firmware installation
The TFT screen has its own firmware, it’s very easy to flash:
- Everything must be off, so turn off the power and unplug the USB from your computer.
- Download the special firmware for the TFT I3 RS display
- unzip it and put it all (mks_pic folder, mks_config, mkstft28 and MksWifi files) to the root of an SD card
- Insert SD card in the TFT
- Turn on
There you have an update message, or you have a blank screen, if so, do not touch anything for two minutes while the update is done and the screen will restart in the colors of the I3 RS 🙂
First movement test
Now we will download the Repetier Host software and the basic configuration file for the I3 RS.
- Install Repetier Host
- Open it and go right to the “slicer” tab, check that “Slic3r Prusa Edition” is selected and click on “configuration”
- The window of “Slic3r Prusa Edition” opened, click on “File” then “Load Config Bundle” and point to the configuration file you unzipped(Slic3r_config_bundle.ini).
- We close the Slic3r window and in Repetier, we go to Setup> Printer Setup, we select the correct COM port and then “Apply”.
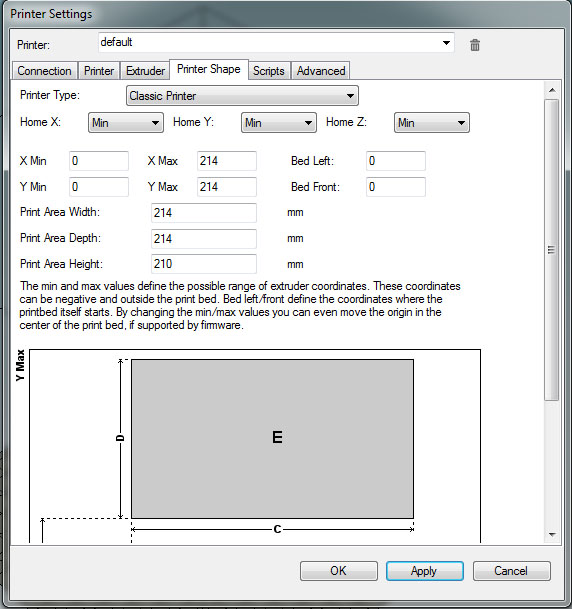
- Still in the “Printer Settings” window, go to the “Printer Format” tab and fill in like this, then OK
- We click on the icon “Connect” on the left, it must go green.
We will now move the axes of our 3D printer! For this, tab “Manual control” But above all, manually place each axis in the middle of the race.
- you have 3 sets of buttons, the left one controls X and Y, the middle one Z, and the one on the right the extruder.
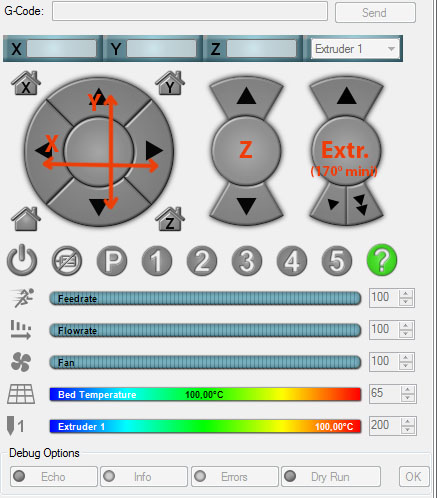
- When you click down on the left button set, the tray (Y) must move backward from the value in mm you have clicked and vice versa.
- When you click to the right, the extruder (X) must go to the right of the value in mm that you clicked.
- Same with Z on the middle button set
- And the same for the extruder, but it does not work until the print nozzle reaches 170 °.
- Also test the printing fan by clicking on the fan icon a little lower, similar for the heating head and the heating bed
Note: If one of the motors does not rotate in the correct direction, simply turn its plug 180 ° on the MKS Base.
We will test for the first time our 3 stop sensors, for this click on the home button Home still in the tab “manual control” Repetier. Tip: keep the mouse near the emergency stop under Repetier if a sensor is badly wired ^^
When the Z axis goes down, we must see the BLtouch turn blue and deploy its stem before touching the tray, and when it goes back it goes red when folding its stem, if it is not the case, re-check your wiring of the red / brown / yellow servo wires of the BLTouch.
Everything went well ? It’s finally time to do our first print test and settings
bonjour je commande un routeur avec un pc mais je voudrai simplifier la chose avec votre système , j ai une imprimante 3d que je commande comme vous via carte sd programme cura
auriez vous un tuto en Français pour l installation des firmwares et soft à utiliser pour y passer mon fichier gcode merci
en espérant que vous ayez compris ma question
pour le moment j utilise un prog pour vectoriser puis un autre pour faire un dxf que j envoie en gcode pour mach 3 je pense qu il y a moyen de simplifier….
Bonjour Eric,
J’avoue ne pas avoir très bien compris la question, je ne sais même pas si la question est pour une imprimante 3D ou CNC !
Le mieux est d’ouvrir un post sur le forum
Romain
Hi ,
can you give me the led code for marlin 1.1.9 ?
thank you 🙂
Hi Rapha,
The code is included to Marlin, this is just an option to set at the bottom of “configuration.h” tab.
Romain
bonjour
j ai fais une I3R qui fonctionne tres bien (merci à vous)
je voudrais savoir si il serait possible de mettre l’option coupure de courant (reprise de l’impression après une coupure de courant) sur la I3R .
si oui comment ou que faut il faire évoluer?
Merci d’avance .
Claude
Bonjour Claude,
J’ai déjà répondu à votre commentaire sur une autre page, je vous remets ma réponse ici:
Cela ne dépend ni de la carte, ni du firmware, mais de l’écran TFT qui embarque son propre Firmware.
Pour pouvoir mettre cet écran sur la I3-R, il faut acheter l’écran TFT32 + la carte MKS BASE 1.6 en remplacement de la ramps 1.4.
Bonne journée
Romain
Re
Merci pour cette réponse (j ai pas vu l’autre !!)
Ok donc il faut que je change la carte et l’ecran mais pour le firmware je prend celui de la I3RS ?
Merci d’avance
Claude
Non on peut garder le firmware de la I3-R car la MKS a les sorties attribuées comme la ramps 1.4, mais tu peux désactiver la gestion du LCD dans le firmware car il ne servira plus.
Par contre tu peux charger le firmware TFT I3-RS sur le TFT.
Romain
Bonjour, j’aurais voulu intégrer le module LED RGB sur ma CR Ender 3 mais ce n’est pas une carte MKS. Aurais-tu une idée du câblage de ce module pour sa carte?
Et au niveau du firmware Marlin?
Merci d’avance,
Joseph
Hello, il suffit d’avoir des pins libres sur ta carte et de renseigner leur numéro dans la section RGB led de l’onglet configuration.h dans Marlin (tout en bas)
Bonjour, merci pour ta réponse. Le problème , c’est que c’est une carte Melzi et je ne vois pas grand chose de libre… Mais je pense la faire évoluer vers une MKS.
Une autre question, sur la Tevo Little Monster par contre j’ai des pins de libre mais ce n’est pas du Marlin mais du Smoothieware. Je sais qu’il faut aller dans le fichier config.txt mais je ne vois pas les pins correspondants.
Hello, Smoothie ne gère pas cette option, d’ailleurs Smoothie gère très peu d’options ^^
Romain
Romain
i have mks base 1.6 i guess i have problem with bl touch sensor ,,i cant adjust touch sensor its scratching my heatingbed and my nozzle get allways blocked one thing i noticed is when it goes down i see very tiny blue light
when it deploys its show bright red what is standby color i have red i did change ground wiring mks base has ground in middle connected as S G 5V
heatingbed sheet is allmoust destroyed
Hi Osman, you have to set your Z offset as explained in tutorial.
Romain
Romain
thank you for your reply i made it but my number is so low -0.25
Each Printer need a different Z offset !
Romain
Bonjour
on peut flasher le tft avec une clef usb ou c’est uniquement avec une carte SD?
Bonjour Nico,
Le flashage du TFT fonctionne uniquement avec la SD.
Romain