- Download firmware for RS-CNC (Beta V0.95, updated 15/10/2018)
- If you do not already have it, download the IDE Arduino software and install it..
- Connect USB cord to the Mega2560 and see if its is recognized by your operating system, it may need either CH340 drivers or Atmega 16au drivers depending on the board manufacturer.
Installing the Mega2560 / CNC Shield Firmware
- Open IDE Arduino
- Select Tools> Card Type > “Arduino/Genuino Mega or Mega 2560”
- Then Toolss > Port > and select the COM port of your board
- Then open: Files > Open > Folder where you unzipped the firmware > Firmware_RS-CNC_V0.95 > Repetier-firmware > Repetier > Repetier.ino
- We click on
 , there it starts to compile and then upload the firmware on the board.
Installing the TFT firmware
- Download firmware for TFT (Beta V0.6, updated 15/10/2018)
- Take a SD card
- Put the contents of the folder “FirmTFT_RS-CNC” (4 files and folders) to the root of the SD card
- Then put the SD card in the TFT SD drive
- Turn on the TFT
- There we see the update to be done alone and the screen restart once finished (it can take a couple of minutes)
First move test
- Download Repetier Host if you do not have it already then install/open it.
- Go to Configuration > Printer settings, and specify the correct COM port
- Switch on the RS-CNC
- Click on the icon “connect” at the top left
- Go to the “Manual Control” tab on the right
- You have 3 sets of buttons, the left one controls X and Y, the middle one Z, and the one on the right the extruder (but we do not need the latter in our case!)
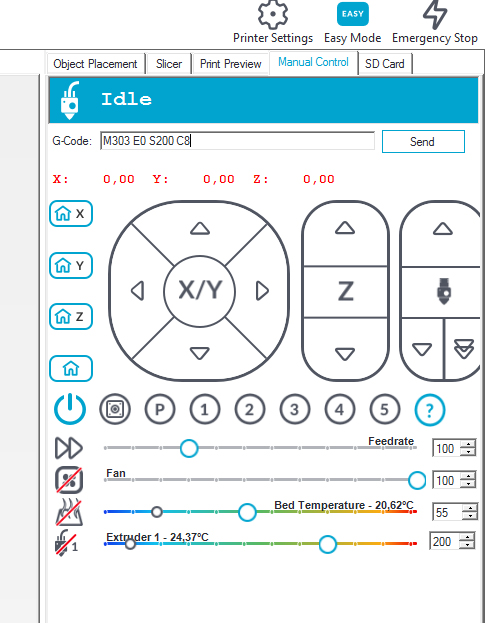
- On the X / Y set, when you click on the top arrow, the spindle must go backwards and vice versa, when you click on the right arrow, the cutter goes to the right and vice versa.
- On the set Z when we click up, the spindle rises and vice versa.
- When we click on Home X, the spindle comes to the stop on the left, when we click on Home Y, the spindle comes to a stop towards us, When we click on Home Z, the spindle comes to a stop at the top.
- If you need to reverse the direction of an axis, open Repetier.ino again under Arduino IDE, “configuration.h” tab, look for these lines
#define INVERT_X_DIR 1
#define INVERT_X2_DIR 0
#define INVERT_Y_DIR 1
#define INVERT_Y2_DIR 0
#define INVERT_Z_DIR 0
- Replace the 1 by 0 or vice versa to reverse the direction of the corresponding motor and press to load the news modifications on your board.
Note: you can not use the TFT and the connected computer controls at the same time, it’s one or the other at a time.
Nunchuk use
To move the X and Y axes, hold down the C button, to move the spindle backward, push the lever forward and vice versa, to move right, push the lever to the right and vice versa.
To move the Z axis, hold down the Z button, when you push the lever forward, Z goes up, and vice versa.
Now that your RS-CNC is well configured, we will be able to go to the first use 🙂
Is it later possible to use Repetier-Server and a Raspberry Pi 3B+ to control the Milling-Jobs?
Hi Chris, Yes i think it’s possible because the raspberry Pi uses a serial uart like the actual TFT touch screen.
You can add a cheap wifi module on the MKS TFT to control the machine by wireless
Romain
hi i keep gettig this error message when trying to uplad firmare
This report would have more information with
“Show verbose output during compilation”
enabled in File > Preferences.
Arduino: 1.0.6 (Windows NT (unknown)), Board: “Arduino Mega 2560 or Mega ADK”
Nunchuk.cpp: In member function ‘void NunchukDeviceClass::init()’:
Nunchuk.cpp:11: error: ‘Wire’ was not declared in this scope
Nunchuk.cpp: In member function ‘void NunchukDeviceClass::loop()’:
Nunchuk.cpp:43: error: ‘Wire’ was not declared in this scope
Nunchuk.cpp: In member function ‘void NunchukClass::interp(NunchukClass::t_InterpAxis, byte, float&, int32_t&)’:
Nunchuk.cpp:145: error: expected primary-expression before ‘[‘ token
Nunchuk.cpp:145: error: expected primary-expression before ‘{‘ token
Nunchuk.cpp:145: error: expected `}’ before ‘{‘ token
Nunchuk.cpp:145: error: expected ‘,’ or ‘;’ before ‘{‘ token
Nunchuk.cpp:145: error: expected primary-expression before ‘,’ token
Nunchuk.cpp:146: error: expected primary-expression before ‘[‘ token
Nunchuk.cpp:146: error: expected primary-expression before ‘{‘ token
Nunchuk.cpp:146: error: expected `;’ before ‘{‘ token
Nunchuk.cpp:146: error: expected primary-expression before ‘,’ token
Nunchuk.cpp:147: error: expected primary-expression before ‘[‘ token
Nunchuk.cpp:147: error: expected primary-expression before ‘{‘ token
Nunchuk.cpp:147: error: expected `;’ before ‘{‘ token
Nunchuk.cpp:147: error: expected primary-expression before ‘,’ token
Nunchuk.cpp:148: error: expected primary-expression before ‘}’ token
Nunchuk.cpp:148: error: expected `;’ before ‘}’ token
Nunchuk.cpp: At global scope:
Nunchuk.cpp:150: error: expected unqualified-id before ‘if’
Hi, your Arduino IDE software seems a little bit old (1.0.6), try with the last version of arduino IDE (1.8.5)
Romain
lol thankyou must be one of those days
je me suis laisser tenter j’ai fait un kit cadre aluminium je vais commencer a imprimer les pièces ce week end
la seul question que je me pose : j’aimerais mettre des stepper driver TMC 2130 et les utiliser en endstop XY et Z+ . y as t’il des modification firmware a faire ou uniquement branchement ?
autre petite question pour le Z offset on peut faire un M851 Z…. puis M500 ou il faut obligatoirement passer par la firmware ?
encore une foi merci pour ce super boulot
Bonjour Arnaud, Les drivers sont intégrés à la MKS BASE 1.6, il est donc impossible de mettre des TMC 2130 sur cette carte, à moins que tu en aies une autre ?
Dans tous les cas avec des TMC 2130 il faudra modifier le firmware à plusieurs endroits oui.
Oui il est possible de modifier le Z offset comme tu l’as mentionné.
Romain
Hello,
que faut il modifier dans le firmware si on ne veut pas installer de endstop ? j’ai modifié ma r-cnc pour employer le relais de la spindle l’ecran tactile et le nunchuk mais je n’ai pas envie d’installer les endstop car jamais employé jusqu’à maintenant.
Merci d’avance
Alex
Hello, le plus simple est de placer des jumpers sur les pins X-, Y- et Z+, sinon oui on peut modifier le firmware, je ne me souviens plus du nom exact des lignes de tête, il faut que je regarde. Dans tous les cas, il faudra faire attention à ne pas demander un Home accidentellement sur le TFT s’il n’y a plus les endstops !
Romain
Dear RoMaker,
i finished the setup with the arduino, your board, stepper driver and steppers, but the steppers move only in one direction, either with the nunchuk, the tft or repetier host.
Perhaps you know, what is wrong and what I have to do.
The mill is not finished yet, but I will send you a picture, when I finish and I show it on thingiverse.
Thank you in advance
Karl-Heinz Müller
Hi Karl-Heinz !
Have you wired endstops in “NC” (normaly closed) like the tutorial ?
If you have another questions, please use the forum, international section 🙂
Cheers
Romain
Dear RoMaker,
thank for your fast response!
I connect the endstops and it works fine.
Excause my late answer.
Greetings
Karl-Heinz Müller
Romain, la carte que j ai achete sur ta boutique tourne sous marlin ? ou specifique ?
Bonjour Marc,
Le shield tourne sous un firmware spécial à base de Repetier Firmware (plus stable et précis que Marlin) et modifié par la communauté du forum de façon à faire fonctionner les nouveaux accessoires, dont le joystick Nunchuk pour les déplacements manuels. Tout est disponible page “firmwares RS-CNC” du tutoriel de la RS-CNC.
Romain
bonjour
je tiens d’abord a te dire bravo pour ton travail !
qui et excellent franchement encore merci !
bon maintenant revenons a la réalité
je viens de finir mes branchements de ma RS-CNC
mais un petit problème se pose
ma carte arduino brancher seule fonctionne bien port USB aussi
mais quand je la mais avec la shield CNC il ne détecte plus le port
donc j’ai télécharger et installer CH340 et rien de plus ou alors je le fais pas bien
merci pour une réponse de ta part
cordialement
christophe
Bonjour Christophe,
Là avec les infos dont je dispose il est difficile de répondre pertinemment, le mieux est de créer un post sur le forum avec un bon résumé avec un maximum d’informations sur le soucis rencontré, des photos du câblage du shield seraient également les bienvenues, et on trouvera la solution, car là les commentaires sont plutôt destinés aux renseignements.
Romain
bonjour je viens de recevoir ma carte Arduino commander via la liste des pièces malheureusement c une due R3 et je n’arrive pas a compiler dessus malgré la mise a jour pour la carte dans Arduino et le bon port série choisi Arduino Due (programming port)
#error Oops! Make sure you have ‘Arduino Mega’ selected from the ‘Tools -> Boards’ menu.
help ..
merci
Bonjour,
Ce n’est pas la bonne carte, le firmware et le shield sont prévus pour fonctionner avec une Mega2560, pas une Due. La seule solution est de commander une mega2560
Romain
Ok merci j’ai commandé une nouvelle et nikel.
Par contre je me posée la question étant usineur de métier et il possible de faire varier les avances d’usinage en cour de programme comme les approches en début de programme pour s’assuré du bon déroulement du programme? Merci pour toute ton aide a tous les passionnés.
Hallo,
ich bin ein blutiger Anfänger. Habe meine RS-CNC fertig montiert. Bin dabei die Verkabelung zu machen. Dazu habe ich einige Fragen:
– Wie wird der TFT verkabelt, worüber bekommt er die Spannung?
– Die Firmware wird nach dem kompletten Verkabeln installiert?
– Kann ich die RS-CNC auch direkt mit dem Rechner und Estlecam steuern, wie?
Hi JoeRue,
My German skills are very low, i understand only French and English, please use Forum for any Technical question (In English or French)
Thank you for your understanding 🙂
Romain
Hi,
I have following problem.
Everything works great except the Z AXIS for some reason when I press 10mm it makes 1mm movements. When I press 1 mm it makes 0,1 mm movements and so on. The same thing happens during operation. When I try to mill a project instead of lowering 1 mm it is lowering 0,1 mm. I checked the controllers and they seem do be fine. Can anyone help me because the machine looks really great.
Hi Andreas, check the setting of levers of the TB6600, they have to be set on 1/4 step.
Romain
Hi Romain,
Thank a lot for your answer. I checked the settings. They are all the same at 1/4 step. I changed at the configuration file the steps/mm to 3000 and now it seems to be working fine. (only for the Z axis) But I am not sure that this is the correct way.
Best Regards,
Andreas
Set step/mm in the firmware is a different way, but it’s weird, your driver seems to get an issue.
Hello! Tell me, does the firmware support a regular lcd screen? How to connect it?
Hi, the firmware support only SPI TFT.
Romain
Bonjour,
J’ai une RS-CNC depuis 1 an qui fonctionnais très bien mais j’ai eu un souci avec l’alimentation, je l’ai donc changée.
Mais depuis je n’arrive plus à piloter la CNC depuis mon TFT, j’ai essayé en USB, je me connecte bien avec repetier mais ensuite quand j’envoie une commande de déplacement j’ai une erreur timeout. Pourtant quand t’utilise le joystick tout fonctionne parfaitement. J’ai changé l’arduino mais cela n’a rien changé à mon problème
Bonjour Julien,
Il faut choisir le bon, port COM dans repetier ou arduino, et la bonne vitesse de communication
J’ai choisi le bon com, le COM 5 comme sur arduino, et repetier se connecte bien pourtant. Mais deja les commandes de déplacement ne fonctionne pas avec le TFT, le tactile fonctionne car je navigue dans les menus mais si je choisi un fichier ou que je demande un déplacement rien ne se passe. J’ai la CNC depuis 1 an et elle marchais très bien jusqu’a ce que l’alim crame
Bonjour Romain, merci pour ce projet que je reprends après une longue pause.
Tout est fini et assemblé mais j’ai un souci avec l’axe Z+ tout le reste fonctionne sauf la remontée de broche … Une piste ? je pensais à l’attribution de pins éventuellement dans le code arduino mais je ne serai pas le seul à rencontrer ce souci … sion aurais tu la possibilité de me confier le schema de cette ancienne carte de contrôle vérifier qu’il n’y ai pas un souci de continuité ou un composant endommagé …. Ce serait génial. Je t’ai commandé la dernière version de ta carte mais si je pouvais déjà commencer à l’utiliser avec celle ci en attendant de tout recevoir ce serait parfait 🙂
Bonjour Olivier,
Si Z ne va que dans un seul sens, il faut vérifier le câblage du câble “Z DIR” qui va de la carte au driver ainsi que le +5V au niveau de Z DIR sur le driver, également rechercher d’éventuels faux contacts si le câblage est bon.
On peut également vérifier la soudure du STM32 sur la pin “PA5”
Pour d’autres questions technique merci d’utiliser le forum !
Romain