TFT calibration on 1st start
- When switching on for the first time, you are invited to calibrate the touch screen, for this, precisely press each corner indicated on the screen with the stylus supplied with the TFT.
- If you want to redo the calibration:
- On your computer, create a new text file (.txt) using Notepad (on Windows) or TextEdit (on Mac OS).
- Save this file as calibrate.txt. The file does not need to contain any “inside” text, only its name (calibrate) and extension (.txt) are important.
- Drop the created file at the root (this is very important) of the SD card and Insert the card into the slot at the back of the TFT.
- turn on your machine
- On restart, you will be asked to perform the TFT calibration again.
CAUTION, you must remove the calibrate.txt file from the SD card once the recalibration has been carried out, otherwise, each time you restart, the machine will ask you to recalibrate the screen. If you want to keep the calibrate.txt file for future use, you can keep it on your SD card, as long as you move it there to a directory you create.
Nunchuk use
- To connect the Nunchuk, if you have printed the printable cover, there is a key, if you connect it without the cover, check the direction of the socket contacts, on one side there are 3 contacts, on the other 2 contacts.
- Nunchuk must be plugged in before switching on. It is not recognized if it is plugged in afterwards. It is not active if you are in USB or Telnet mode (use the pc in this case)
- Nunchuk is active when the machine is in Idle or Jog state
- To move X and Y axes, keep button C pressed, to move the gantry backwards, push the lever forward and vice versa, to go right, push the lever to the right and vice versa.
- To move the Z axis, hold down the Z button, when you push the lever forward, Z goes up, and vice versa.
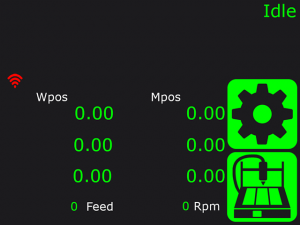
Main screen (Info)
![]() Access to the settings menu
Access to the settings menu
![]() Access to the Mill menu
Access to the Mill menu
![]() Telnet connection between the computer and the TFT is disabled (This does not mean that the TFT is not connected to your Wifi network!)
Telnet connection between the computer and the TFT is disabled (This does not mean that the TFT is not connected to your Wifi network!)
Wpos: These are the coordinates compared to the current coordinate system, we modify this coordinate system using the submenu Set WCS ![]()
Mpos: These are the coordinates with respect to the machine zero, which is initiated via the “Home ” command.
Idle: GRBL state
0 Feed: Current feed rate, in mm/min
0 Rpm: Current Spindle speed in revolutions/min
Note that there are also 2 “hidden” buttons on this screen:
- In the upper left corner: shortcut to see GRBL messages
- In the upper right corner: shortcut to modify the feedrate and the Rpm
Settings menu

![]() Used to unlock the machine, to exit the “Alarm” state
Used to unlock the machine, to exit the “Alarm” state
![]() Reset software
Reset software
![]() Home, Starts the homing sequence
Home, Starts the homing sequence
![]() Back to Main screen
Back to Main screen
![]() Access to the submenu for the choice of the type of connection between the TFT and the GRBL board. Only for V2.0 boards, Not available on V1.0/V1.5
Access to the submenu for the choice of the type of connection between the TFT and the GRBL board. Only for V2.0 boards, Not available on V1.0/V1.5
![]() Access to the WCS reset sub-menu (workcoordinates system):
Access to the WCS reset sub-menu (workcoordinates system):

- WCS of the axes can be set to 0 separately (Set X=0 or Set Y=0 or Set Z=0)
- Or set the WCS of the 3 axes to 0 simultaneously ( Set X,Y,Z=0,0,0)
![]() Access to manual axis move :
Access to manual axis move :
- When you arrive in this submenu, the “AUTO” icon is present, if you keep pressed on the movement of an axis (for example Y-), then this axis will move until you no longer press the button (or you reach a limit switch hahaha), the Auto mode works in the same way as the Nunchuk.
- If you press the “AUTO” button several times, you change the displacement step in millimeters (100,10,1,0.1,0.01) select the desired length, then briefly press an axis (example X +), and X + will move by the displayed length. Info: If you choose 100mm for the Z axis, it will only move 10mm for safety.
![]() Access to tool change menu: (coming soon)
Access to tool change menu: (coming soon)
![]() Access to the custom button menu (macro):
Access to the custom button menu (macro):
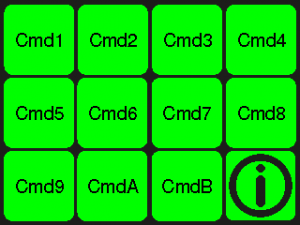
–>Go to the “custom button creation” special page<–
Mill menu
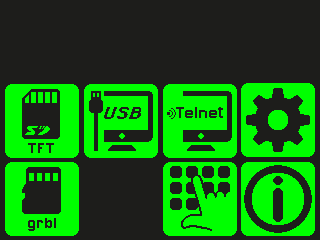
![]() Activate the USB of the ESP32 of the TFT to connect a computer to GRBL via the TFT
Activate the USB of the ESP32 of the TFT to connect a computer to GRBL via the TFT
![]() Activates Telnet (wifi) to connect a computer to the GRBL board via the TFT in wifi
Activates Telnet (wifi) to connect a computer to the GRBL board via the TFT in wifi
![]() Access to the custom command buttons menu
Access to the custom command buttons menu
![]() Access to the SD card file explorer on the GRBL board (preferably used for milling files)
Access to the SD card file explorer on the GRBL board (preferably used for milling files)
![]() Access to the file explorer of the SD card integrated into the TFT
Access to the file explorer of the SD card integrated into the TFT
SD files explorer:

Once you have selected your file, you’ll get the confirmation page:

![]() Starts the file and the milling
Starts the file and the milling
![]() No/Cancel and back to SD files explorer
No/Cancel and back to SD files explorer
Milling in progress screen:
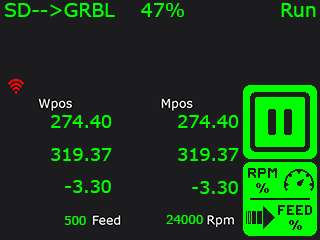
![]() Pause (Hold) (can also be done via the physical “Hold” button of the GRBL32bits V2.0 board)
Pause (Hold) (can also be done via the physical “Hold” button of the GRBL32bits V2.0 board)
![]() Access to Feedrate/RPM menu:
Access to Feedrate/RPM menu:
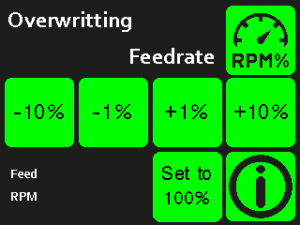
Overwritting Feedrate: This menu is used to modify the feedrate of the axes during milling. You can decrease or increase the percentage of the feed rate.
![]() Access to Overwriting Spindle(RPM) menu
Access to Overwriting Spindle(RPM) menu
![]() Back to Milling in progress screen
Back to Milling in progress screen
![]()
Overwritting Spindle(RPM): This menu is used to change the spindle speed during milling. You can decrease or increase the percentage of revolutions per minute. Obviously only works with variable speed spindles.
![]() Access to Overwriting Feedrate menu
Access to Overwriting Feedrate menu
![]() Back to Milling in progress screen
Back to Milling in progress screen
Milling paused screen (Hold)

![]() Resume milling in progress (Can also be done via the physical “Start” button of the GRBL32bits V2.0 board)
Resume milling in progress (Can also be done via the physical “Start” button of the GRBL32bits V2.0 board)
![]() Access to More menu:
Access to More menu:

![]() Cancel milling
Cancel milling
![]() See the current G-code (this icon does not appear for a file started from the SD of the GRBL board)
See the current G-code (this icon does not appear for a file started from the SD of the GRBL board)
![]() Back to Milling in progress screen
Back to Milling in progress screen
Access the contents of the TFT SD card by Wifi:
If you have not changed the original IP addresses in the TFT firmware config.h file, simply open your web browser and enter the IP address 192.168.1.10

You get this menu:

Directory: To access and manage the contents of the SD card
Upload: To send files from your computer to the SD card