Download the IDE Arduino software
- Install the Arduino software
- Install the U8glib library :
- Go to Sketch > Include library> Manage libraries and search “U8glib” and install them
- Close Arduino software
Download the Marlin firmware for your I3-R hardware configuration:
- 8mm leadscrew, 16 teeth pulleys, A4988 drivers
- 8mm leadscrew, 16 teeth pulleys, DRV8825 drivers
- 1mm leadscrew, 16 teeth pulleys, A4988 drivers
- 1mm leadscrew, 16 teeth pulleys, DRV8825 drivers
And:
- Unzip and open by clicking Marlin-I3R-EN > Marlin-I3-R > Marlin > Marlin.ino
- Once the driver is installed, in the Arduino software, go to Tools> Boards, and select “Mega 2560”
- Then Tools> Port, and select the port of your card.
- Upload the firmware by clicking on
 . This may take a little time.
Note: The firmware is provided for a certain configuration: 1.8 ° motors, pulleys 16 teeth, leadscrews with 1mm pitch and microsteps set in 1 / 16th step. If your configuration differs, you’ll need to change the values at the “#define DEFAULT_AXIS_STEPS_PER_UNIT” line on the Configuration.h tab. To help you, you can use this calculation tool.
Now we will download the Repetier Host software and the Slic3r basic configuration file for the I3-R.
- Install Repetier Host
- Open it and go to the right to the “slicer” tab, check that “Slic3r” is selected and click on “configuration”
- The Slic3r window has opened, click “File” then “Load Config Bundle” and point to the configuration file you unzipped.
- Close the Slic3r window and in Repetier, go to Configuration> Printer Setup, select the correct COM port and then “Apply”.
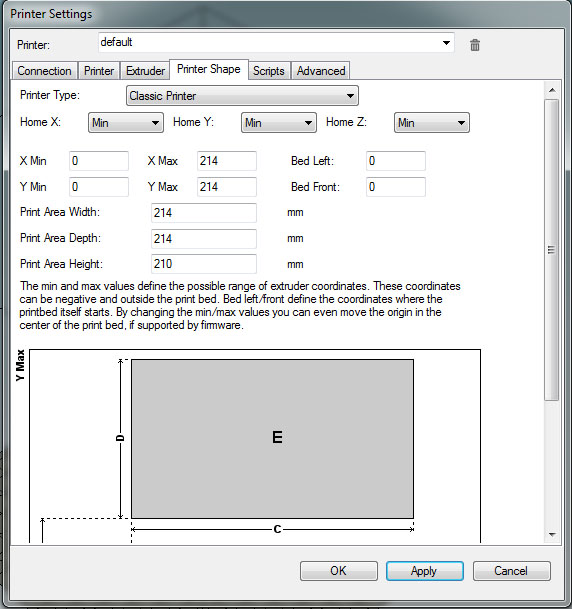
- Also in the “Printer Settings” window, go to the “Printer Shape” tab and fill in as follows, then OK
- Click on the “Connect” icon on the left, it must become green.
We will now move our 3D printer axes ! To do this, “Manual control” tab. But above all, manually position each axis in the middle of the travel.
- You have 3 sets of buttons, the left control X and Y, the middle Z, and the right one the extruder.
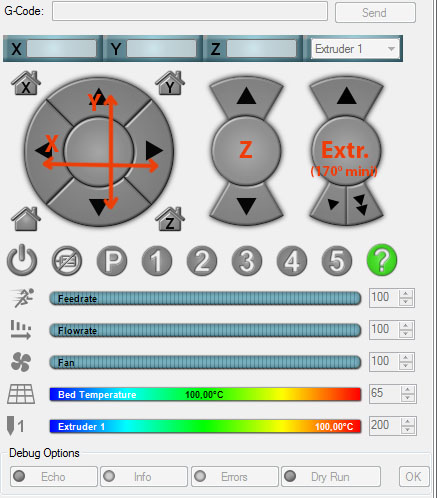
- When you click down on the left button set, the tray (Y) must move backward from the value in mm you have clicked and vice versa.
- When you click to the right, the extruder (X) must go to the right of the value in mm that you clicked.
- Same with Z on the middle button set
- And the same for the extruder, but it does not work until the print nozzle reaches 170 °.
- Also test the printing fan by clicking on the fan icon a little lower, similar for the heating head and the heating bed
Note: If one of the motors does not rotate in the correct direction, simply turn its plug 180 ° on the Ramps 1.4
Now that we have tested everything, there is one last detail to adjust before you can spit plastic … the height adjustment of the inductive sensor! It’s a bit tedious, but afterwards we’ll no touch it a little longer!
- Manually, touch the heatbed with the nozzle
- Rotate the sensor in its thread and turn it to the thickness of 3 paper sheets placed on the heatbed (equivalent to 3 / 10th of a millimeter)
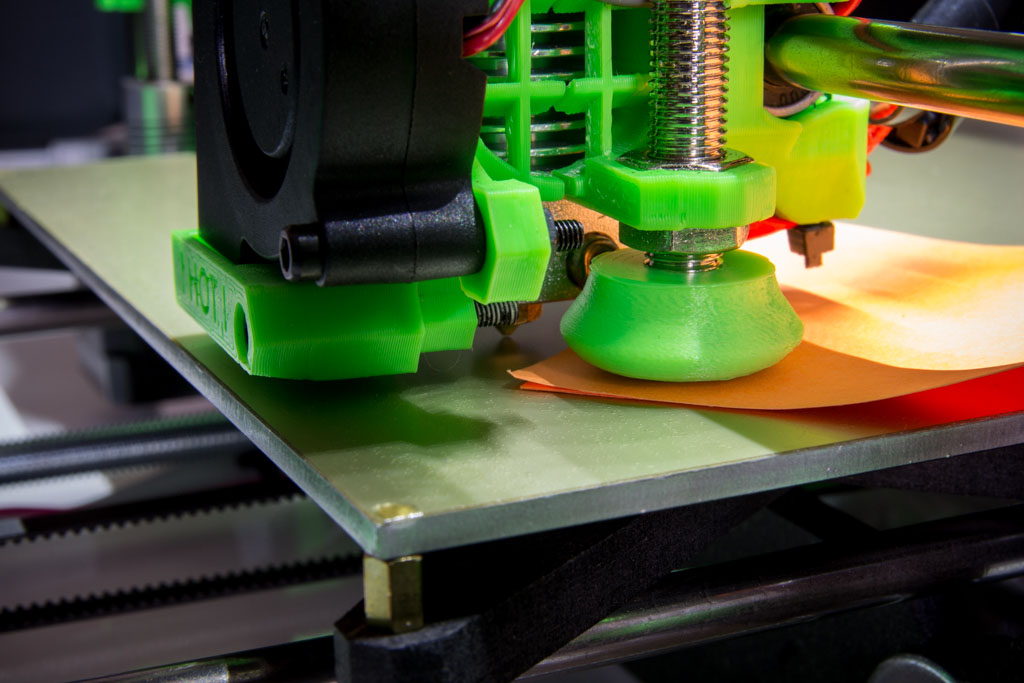
- Tighten the nuts a little
Note: This sensor type really does not have a wide range of detection, the lesser half millimeter won is good to take, on mine, I filed the plastic end until the metal appeared in transparency !
In order for the X axis to be parallel to the printing plate, I proceed as follows:
- I put an object on the side of the tray and I manually lower the set by turning the trapezoidal screws until it touches.
- When it touches on one side, I do the same on the other side
- And I put my object on both sides to check.
We will test for the first time our 3 thrust sensors, click on the Home button in the form of a house always in the “manual control” tab of Repetier. Tip: Keep your finger on the emergency stop button next to the LCD knob when a sensor is incorrectly connected or the inductive sensor is too high compared to the nozzle!
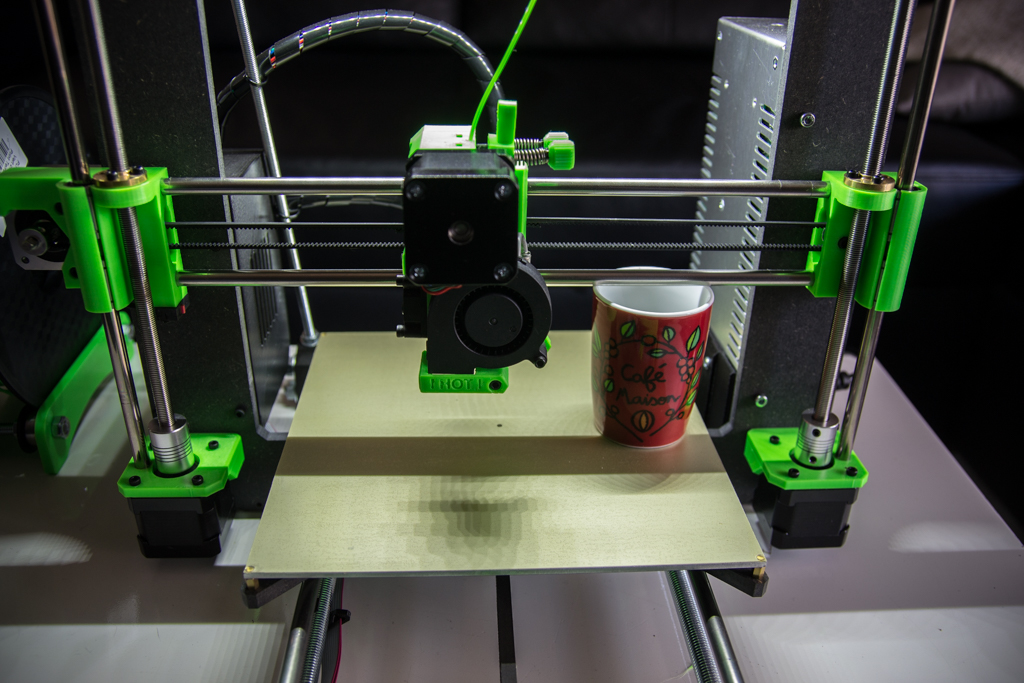
Everything went well ? It’s finally time to do our first printing test!
- To insert the filament, remove the screws with the extruder springs
- Opening the flap
- The end of the bevel filament is cut
- The filament is passed through the hole at the top of the extruder
- It is passed in front of the notched wheel into the teflon tube
- It is pushed to the stop
- Replace the screws with the springs
The 3D printer is ready! .. There is one last detail … Our file to print!
- Download a .stl file, for example a calibration set
- We unzip and open the desired file with Repetier
- You can change the layout of the part on the tray (optional)
- Then we go to the”Slicer”tab
- The PLA or ABS preset is selected, “normal speed” print settings, “my settings” printer settings.
- We click on “Slice whith Slic3r” and we automatically land on the “print preview” tab
-
Now we are ready to start printing, we have two solutions, either you do it with the printer connected to the computer by clicking directly on “Print” in the “Preview print” Tab, Either you click “Save “To save your .gcode file that you can put on an SD card that you insert on the left side of the LCD and you start printing from the LCD, so you don’t need to be connected to the computer 🙂
Here is how to initialize:
- The heatbed rises in temperature.
- Once the correct temperature has been reached, the 3 axes come to home.
- The induction probe senses 9 points on the plate to know its “topography” at the same time as the head begins to heat.
- Printing starts.
Note: As soon as the first material is deposited on the tray, make sure that the deposit is not too crushed, or not enough, if it is the case, cancel the printing immediately, if it is too crushed, A little the inductive sensor, if it is not crushed enough, you have to go up a little sensor.
Note2: The preset temperatures in the config file I have given you, are perfect for me, but the setting may vary depending on the filament marks and temperature probes.
Here ! We’re done ! If you are experiencing difficulties or require further adjustments, do not hesitate to ask questions about the forum 🙂
For any other non technical questions, you can contact me at romaker@makerfr.com
You can help me to translate in English, as you can see, my English is not perfect and you can copy the text, correct the translation and email me ! Thank you very much.
Bonsoir et bravo pour votre travail je suis vraiement interessé de faire cette machine étant utilisateur d’une dagoma je souhaite m’équiper d’une deuxième machine.
La votre serai elle compatible mac je n’utilise que cette plateforme et ne souhaite pas utiliser de pc meme via boot camp
Si oui merci de me le préciser et je ne manquerai pas des le mois prochain de faire l’achat des pièces imprimés de votre i3-R
Bien à vous
Merci pour les encouragements ! Pour faire tourner cette imprimante 3D, on a besoin de Repetier host et de Arduino, qui sont tous les deux dispos en version Mac 😉
bonjour
bravo pour l’imprimant.
je suis novice et donc elle m’intéresse beaucoup, mais je n’ai jamais utiliser de logiciel de modalisation 3d. quel logiciel utiliser vous avec l’imprimante ?
bien a vous
Bonjour !
On a pas besoin directement de logiciel de modélisation 3D pour imprimer en 3D, ça c’est seulement si l’on veut créer ses propres pièces.
Pour imprimer des fichiers STL que l’on peut trouver tous faits sur http://www.thingiverse.com par exemple, on a juste besoin d’un logiciel “trancheur” et tout est expliqué sur cette page !
merci pour les infos, et si l’on veut créer ses propres pieces, quel logiciel me conseillez vous sachant que je suis debutant dans ce domaine.
bien a vous
Pour créer ses propres pièces j’utilise Solidworks, mais il n’est pas gratuit, Pour se faire la main gratuitement je recommande Google Sketchup !
Bonjour J ai commencé les prints des différentes pièces et j ai vu sur la carte qu’à côté du connecteur du moteur de l extrudeur un autre était libre.
Est il envisageable d’y mettre le moteur d un second moteur d extrudeur avec une chauffe commune ?
Cordialement
Oui bien sûr, pour faire une imprimante bicolore avec une tête cyclops par exemple, il faut aussi modifier des paramètres dans Marlin pour activer le deuxième extrudeur et utiliser un logiciel de génération G-code pour la double extrusion.
Je vais pas tarder à m’y pencher pour proposer de fabriquer une I3-R bicolore 😉
bonsoir à tous
ma I3 est fini et tout fonctionne, sauf que les dimensions des pièces sont x 2…..
je suppose que cela doit venir des moteurs pas a pas mais étant vraiment novice je patine dans la semoule d autant que pour le z les vis que l’on m’a expédié ne correspondent pas trop j ai 2mm parcouru pour un tour ………
si quelqu’un peux m expliquer les modifications a effectuer pour que tout rentre dans l’ordre.
merci
Bonsoir,
Ouvre le firmware sous arduino, onglet config.h, cherche la ligne “#define DEFAULT_AXIS_STEPS_PER_UNIT” la valeur de l’axe Z est la 3ème, remplace cette valeur par 1600 (pour des vis trapézoidales au pas de 2mm par tour avec un driver en 1/16eme de pas.)
Pour d’autres questions technique, merci d’utiliser le forum 😉
Romain
bonjour y t’il un réglage de configuration dans merlin a faire si l’on utilise un extrudeur avec une buse de 0.2 au lieu de 0.4
et une autre question peut on utiliser cura au lieu de repetier
merci et bravo pour votre projet
Bonjour,
Il n’y a rien à modifier dans Marlin, la taille de la buse se règle dans les paramètres de l’extrudeur dans le logiciel trancheur (slic3r, cura,…)
Oui bien sûr on peut utiliser Cura
Bonne journée
et bien merci et c’est parti pour la fabrication
Bonjour,
Dans repetier, lorsque je tape la commande gcode M105 pour avoir la température de l’extrudeur et du plateau, l’imprimante renvoie :
10:48:01.507 : echo:N492 M105*40
10:48:01.508 : ok T:24.2 /0.0 @:0
Ici il n’y a que la température de l’extrudeur. J’ai débranché le capteur de l’extrudeur pour le mettre à la place du capteur du plateau et inversement et l’imprimante renvoie :
10:52:30.574 : echo:N581 M105*43
10:52:30.575 : ok T:23.2 /0.0 @:0
J’en conclue que :
– mes capteurs de température (extrudeur et plateau) fonctionnent
– que l’imprimante ne lit pas la température sur le plateau
Est ce que quelqu’un a déjà eu ce problème et aurait une idée pour le résoudre ?
Merci pour votre aide !
Fabrice
Bonjour,
Non, jamais vu cette erreur, le mieux est de poser cette question sur le forum pour avoir plus de réponses !
Bonjour,
merci pour tout ce travail.
Je n’ai encore jamais eu d’imprimante 3D je cherche à acheter une originale mais le délais de 7 semaines me rebute. De plus quand je vois le tarif auquel on peut l’avoir grâce à tes explications…
Peut t’on utiliser la même suite logiciel que l’originale ?
Bonjour,
Quels sont les logiciels de l’originale que vous aimeriez utiliser ?
Bonjour où trouvez le bon driver pour la ramps si elle n’est pas reconnue merci
Bonjour !
En fait tout dépend du modèle de puce qui fait la liaison entre l’USB et la communication série de l’arduino, il en existe plusieurs types et j’ai toujours trouvé mon bonheur en cherchant dans google “driver arduino mega chinoise”
Romain
Bonsoir
J’ai trouvé le bon Driver pour ma carte, (CH 340G), j’ai réussi à connecter, mais j’ai un message d’erreur fatale: “Temp MAx”, et il me faut faire un reset…j’ai bien vu un bouton de reset sur la carte rouge, je l’ai actionné, mais rien n’y fait….?
Bonsoir Jean Luc,
Ce message d’erreur veut dire qu’une sonde de température est mal branchée, ou faux contact ou sonde défectueuse
romain
Bonjour
Merci de ta réponse. Effectivement, c’est la sonde de l’extrudeur (montée d’origine) qui est visiblement défectueuse ou mal montée. je vais vérifier ça et éventuellement la remplacer en espérant que celles du lit chauffant ont les mêmes caractéristiques….
After the program is recorded, the program display is still lit but there is no data on the display.
For technical question, please use the forum board
Bonjour j’ai décidé de faire une 2nd imprimante avec des reste de pièce et voilà c fait . Mon problème et le home z .en effet home x Ok
Home y Ok
La commande manuel Z – Ok sa descent dans le bon sens .
Par contre quand je fait un home général le x et y ok le z lui monte et s’arrête.
Une idée ?
Bonjour,
C’est dû à un mauvais câblage ou le mauvais capteur à induction, car là c’est ce qu’il se passe lorsque la machine capte le signal du capteur Z en permanence, alors qu’il devrait le capter seulement près du bed
OK merci j’ai reçu un nouveau et ça marche nickel par contre il détecte pas toute les matières snif .
peut ton dans le firmware définir normalement ouvert ou normalement fermer en inversant true /false sur des lingne de commande ? car l’autre et quand même mieux il fait toute les matières.
quel sont les code au démarrage et de fin utiliser dans le slicer car le M211/M114/M500 n’est pas pris en compte ?
moi je voulais mettre sa
G28 ;Home
G1 Z15.0 F6000 ;Move the platform down 15mm
;Prime the extruder
G92 E0
G1 F200 E3
G92 E0 ;zero the extruded length
G1 Z2.0 F3000 ;Move Z Axis up
G1 X10.1 Y20 Z0.28 F5000.0 ;Move to start position
G1 X10.1 Y160.0 Z0.28 F1500.0 E15 ;Draw the first line
G1 X10.4 Y160.0 Z0.28 F5000.0 ;Move to side a little
G1 X10.4 Y20 Z0.28 F1500.0 E30 ;Draw the second line
G92 E0 ;zero the extruded length again
G1 F4200
M117 Printing…
; — end of START GCODE —
; — END GCODE —
M104 S0 ;turn off nozzle heater
M140 S0 ;turn off bed heater
G91 ;set to relative positioning
G1 E-10 F300 ;retract the filament slightly
G90 ;set to absolute positioning
G28 X0 ;move to the X-axis origin (Home)
G0 Y280 F600 ;bring the bed to the front for easy print removal
M84 ;turn off stepper motors
; — end of END GCODE —
merci j’ai fait plein de visière déjà avec pour le covid-19.
Oui on peut inverser la logique dans le firmware !
pour le start G-code:
G21 ;metric values
G90 ;absolute positioning
M107 ;start with the fan off
G28
G29
End Gcode:
G28 X0 ; home X axis
M104 S0 ; turn off temperature
M140 S0 ; eteindre lit chauffant
M84 ; disable motors
Bonjour,
Je suis en train de me faire une imprimante 3D perso. J’ai repris les grandes lignes le la I3R.
J’ai installé Marlin 1.1.8 avec toutes les caractéristiques propres a mon imprimante.
J’ai installé un lit chauffant 220V 750W. Je l’ai branché avec un SSR (3-32V CC-CA) (24V-380V 40A SSR-40 DA).
Je n’arrive pas à le paramétrer dans Configuration.h
Comment faire ??
Merci de ta réponse
Bonjour Bernard,
L’emplacement de cette question serait plus approprié sur le forum 😉
Bonne soirée
Romain