Button creation
It’s possible to create up to 11 custom command buttons which will be displayed in the “submenu ![]() ” of “parameters
” of “parameters ![]() ”
”
On your computer, create a new text file and rename it according to the format below:
- The file must always start with : Cmd
- Cmd must be followed by a “number“, which corresponds to the position at which the button will be displayed on the screen. For example : Cmd1
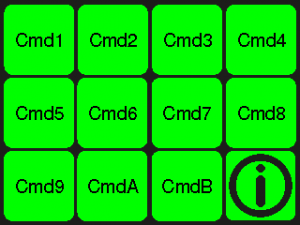
The “number” can be 1, 2,…, 9, A (for 10) and B (for 11). Note that the previous locations do not have to be already occupied to create the “2”, “3”, “11” buttons. For your information, this is where the custom command buttons starting with Cmd1, Cmd2, …, CmdB will be displayed
- Then, the “number” is imperatively followed by an underscore (_) (more commonly known as a dash of 8). Which, for our example, gives: Cmd1_
- The underscore is followed by the name of the button which will be displayed on the screen. The name of the button must not include spaces (you will replace it with an underscore), accents, or characters usually prohibited to name a file (What are they already? It’s simple, when you enter a prohibited character on your PC or Mac will alert you). Do not choose a button name that is too long. If our example button is intended to perform a “Z-probing” when pressed, we could for example name it as follows (.txt being the default extension for text files): Cmd1_Z-probe.txt
- Then open the file and enter the commands you want the button to execute. End the code with a line break and save the file.
- Put the file on an SD card which you insert into the SD reader of the TFT
- In the menu “Mill
 ” -> “SD TFT
  “, press your button’s file, nothing visible happens, that’s normal! But if you press « Info
  » button, you read at the top of the home screen the message “Cmd created”
 - Restart the TFT then go to
 , your button is created and active
Examples of buttons:
Cmd1_Z-Probe.txt contains, for example, the code:
G91 G21 ; (Relative position in mm .)
G38.2 Z-30 F100 ;(Search for the probe on 30 mm. speed 100, if not found after 30 mm. GRBL alarm)
G0 Z1 ; (1mm setback.)
G38.2 Z-1 F10 ; (1 mm probe search, slower, speed 10 )
G92 Z20 ; (Z offset adjustment with probe thickness 20 mm here )
G0 Z3 ; (3mm setback)
Cmd2_Spindle-ON.txt contains, for example, the code:
M3 S24000
For lazy people, here is a pack of buttons already created, that you can use as is or modify them for your own use 🙂
Replace an already created button with a new one:
- Just keep the same “number” as the existing button to name your new button.
To take our example: If you want to replace Cmd1_Z-Probe.txt with a command button intended to power up the spindle, we will name a new file, for example Cmd1_SpindleON.txt, in which we will of course insert the Gcode command: M3 and as for the first, we will place the .txt file on the SD card and launch it. Attention, as for the first button created, and replaced by the new one, the machine will have to be restarted for the replacement to be effective.
Create icons for your custom buttons (optional):
On the SD card of the TFT it’s necessary to load 2 files instead of 1.
- The first is your custom command button file as explained a little above (example, our: Cmd1_Z-Probe.txt)
- The second file must be called Icon1_Z-probe.txt (Number_Name must be identical to the Cmd file, the extension must be .txt)
Here is a video made by HTheatre to learn how to create icons. (Video in French, but you can activate subtitles in your language)
Delete a created command button:
- Create a new text file (.txt) which must include the number of the button you want to delete. For example, to delete the 11th button, your text file should be named as follows: CmdB_delete.txt
The rest of the procedure remains the same. We put the file on the SD card, we start it. If you press « Info ![]() » right after starting it, you’ll read the message “Cmd deleted” at the top of the main screen. But be careful, for the removal of the 11th button to be really effective, you must restart the machine.
» right after starting it, you’ll read the message “Cmd deleted” at the top of the main screen. But be careful, for the removal of the 11th button to be really effective, you must restart the machine.