[provisional tutorial] mount a laser module
Posté : 14 nov. 2019 09:33
Hello !
I specify that this type of diode laser can cut only thin layers of plywood, balsa, cork, paper, cardboard ... It is essentially made for engraving, even for the most powerful diode models.
If you want a real laser cutter, you have to invest in a CO2 laser!
The use of a laser is very dangerous, you must take all measures to protect your eyes using glasses adapted to the type of laser used and be alone in the room where the laser is running.
Depending on the materials in contact with the laser there may be very toxic fumes, avoid burning on PVC, ABS or other plastics without prior information. The room must be ventilated in all cases.
As you know, the laser burns the material, so there is a risk of fire during the job, do not leave the machine unattended.
Do not try to engrave reflective materials that could deflect the laser anywhere, and anyway it would not engrave on it!
Hardware:
A laser module ! This one is a very good quality / price / performance ratio: http://s.click.aliexpress.com/e/drcHwQey
A power supply, 6A minimum : http://s.click.aliexpress.com/e/reLsGvqg
A printable mounting bracket (thanks to Vair327 ): https://www.thingiverse.com/thing:4012864
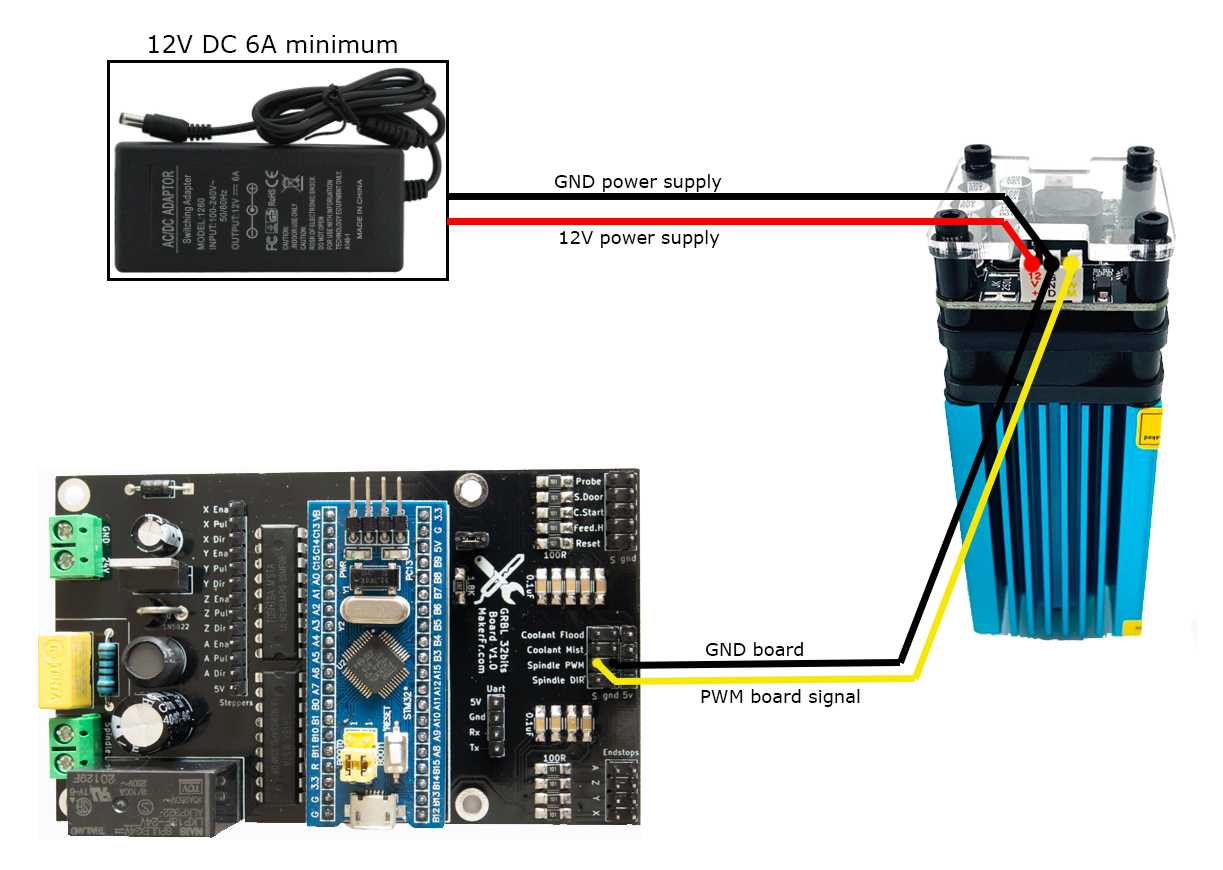
Wiring diagram:

The new firmware modified by MStrens:
Modifications: Signal inversion option developed by Mstrens enabled, Laser mode enabled.
Firmware for custom version: https://www.makerfr.com/wp-content/uplo ... 150120.zip
Firmware for easy way : https://www.makerfr.com/wp-content/uplo ... 20-HEX.zip
Note that once uploaded, you will need to run the $RST=$ command to clear old cache data, be careful if you made any custom changes other than the original ones they will be deleted.
Adjust the focal length:
(coming soon)
First test:
(coming soon)
Turn off the switch of the spindle
laser soft commands:
Laser will be turned on by M4 command (M4 S*** -> *** is a number between 1 and 255, 255 is full power)
Laser will be turned off by M5 command
Power switch, on the laser module: You must first turn on the RS-CNC32 before turning on the laser module, and first turn off the laser module before turning off the RS-CNC32, in short, do not turn on the power of the laser with the RS-CNC32 turned off otherwise the laser lights up full power !
I specify that this type of diode laser can cut only thin layers of plywood, balsa, cork, paper, cardboard ... It is essentially made for engraving, even for the most powerful diode models.
If you want a real laser cutter, you have to invest in a CO2 laser!
The use of a laser is very dangerous, you must take all measures to protect your eyes using glasses adapted to the type of laser used and be alone in the room where the laser is running.
Depending on the materials in contact with the laser there may be very toxic fumes, avoid burning on PVC, ABS or other plastics without prior information. The room must be ventilated in all cases.
As you know, the laser burns the material, so there is a risk of fire during the job, do not leave the machine unattended.
Do not try to engrave reflective materials that could deflect the laser anywhere, and anyway it would not engrave on it!
Hardware:
A laser module ! This one is a very good quality / price / performance ratio: http://s.click.aliexpress.com/e/drcHwQey
A power supply, 6A minimum : http://s.click.aliexpress.com/e/reLsGvqg
A printable mounting bracket (thanks to Vair327 ): https://www.thingiverse.com/thing:4012864
Wiring diagram:

The new firmware modified by MStrens:
Modifications: Signal inversion option developed by Mstrens enabled, Laser mode enabled.
Firmware for custom version: https://www.makerfr.com/wp-content/uplo ... 150120.zip
Firmware for easy way : https://www.makerfr.com/wp-content/uplo ... 20-HEX.zip
Note that once uploaded, you will need to run the $RST=$ command to clear old cache data, be careful if you made any custom changes other than the original ones they will be deleted.
Adjust the focal length:
(coming soon)
First test:
(coming soon)
Turn off the switch of the spindle
laser soft commands:
Laser will be turned on by M4 command (M4 S*** -> *** is a number between 1 and 255, 255 is full power)
Laser will be turned off by M5 command
Power switch, on the laser module: You must first turn on the RS-CNC32 before turning on the laser module, and first turn off the laser module before turning off the RS-CNC32, in short, do not turn on the power of the laser with the RS-CNC32 turned off otherwise the laser lights up full power !