This page aims to explain some possible connections to the GRBL 32bits board
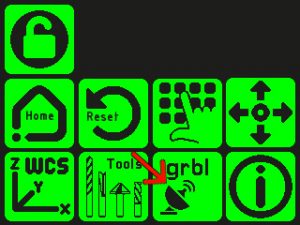
General tip: To easily switch the GRBL card from Wifi mode to Bluetooth and vice versa, I advise you to create 2 personalized buttons on the TFT (see TFT user manual)
- The “Bluetooth_ON” button will contain the command : $Radio/mode=BT
- The “Wifi_ON” button will contain the command $Radio/mode=STA (if you connect through your internet box) or $ Radio / mode = AP if you connect computer to GRBL board.
You will be able to switch the GRBL card to Bluetooth or wifi simply by pressing a button on the TFT! Note that the electronics must be restarted for the change to take effect.
Info1: Because the GRBL board ESP32 cannot have bluetooth and wifi simultaneously because they use the same hardwarez, when you activate Bluetooth, it deactivates wifi, and vice versa.
Info2: When a Bluetooth or Wifi mode is selected, it remains active even after restarts, if you want to use Bluetooth for example each time, we activate Bluetooth only once, it will always be active each time the device is switched on. machine, until another mode is activated.
Info3: In all cases the USB of the GRBL board remains active if you need to connect a serial console to USB
GRBL board / Touch screen, by serial cable (RJ45 sockets)
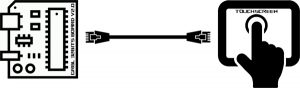
This configuration is the most recommended and the simplest, the touch screen contains almost all the functionalities of GRBL compatible software, the use of a computer connected to the CNC becomes useless. the use of an RJ45 cable instead of pins headers on V1.0 makes it possible to have a cable already crimped, shielded and impossible to plug it in the wrong way !
Installation:
- Connect the RJ45 cable between the two modules, that’s it! (maximum recommended cable length: 50cm)
Info: It is not advisable to simultaneously use the touch screen and the USB connection (Computer connected via USB), as they both use the same serial port. To use the touch screen, nothing must be connected via USB so as not to interfere with the serial communication of the TFT
Info2: The RJ45 cable has two distinct functions: 1-Supplying 5V to the TFT, 2-Exchanging data between the two boards (serial communication)
/!\ Warning: The RJ45 sockets on the GRBL board and TFT are absolutely not Ethernet network sockets, especially do not connect them to computer network sockets on pain of damaging everything!
/!\ Warning: Use only straight RJ45 cables, don’t use crossed RJ45 cables, otherwise the GRBL 32bits board V2.0 kit may be damaged.
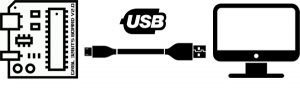
GRBL board/computer, by USB cord
Installation:
- Connect the Micro-USB plug to the Micro-USB port of the ESP32 of the GRBL card, and the USB plug to your computer.
- Open your GRBL compatible CNC controller software like for example bCNC, Candle, or even the Arduino serial console
- Enter the COM port number and connect
Info: It is not advisable to use the USB connection and the touch screen simultaneously, as they both use the same serial port, when you connect your computer via USB, the TFT must be disconnected.
GRBL board/Smartphone or any Android device, by Bluetooth

Installation:
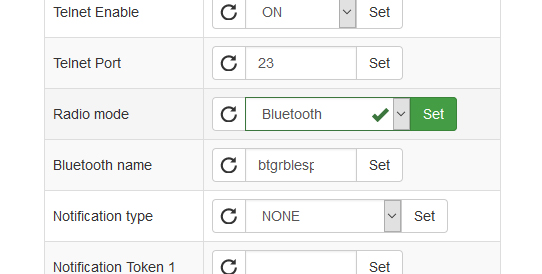
- Under WebUI, go to the ESP3D tab
- In the Radio mode box, select Bluetooth and restart (It is possible to do the same with the command $Radio/mode=BT from a serial console or from a custom button on the TFT)
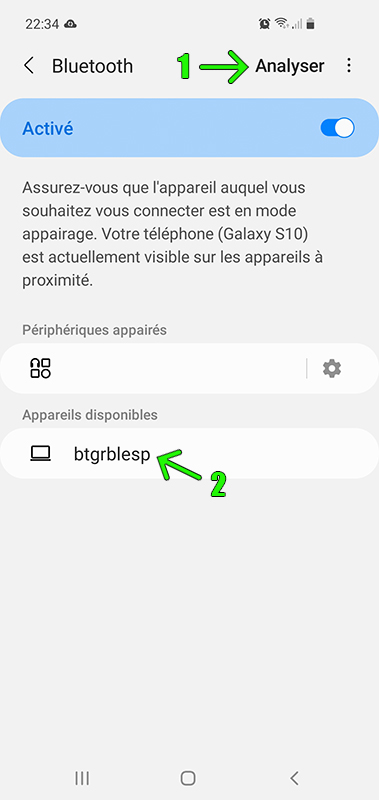
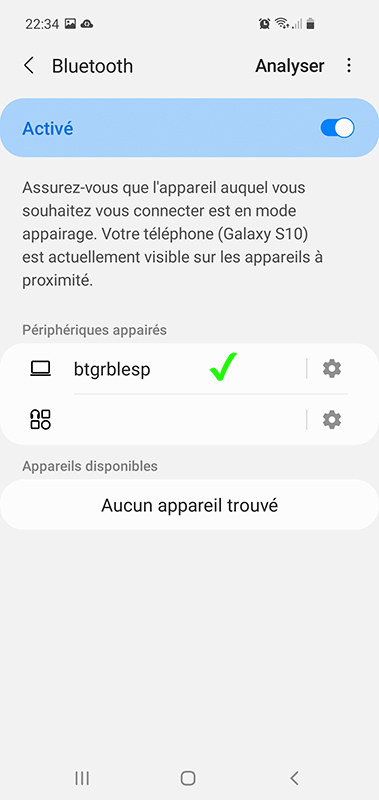
- Go to the bluetooth section of your smartphone or tablet
- Press Analyze (1), then btgrblesp should appear, press it (2), it goes to the list of paired devices
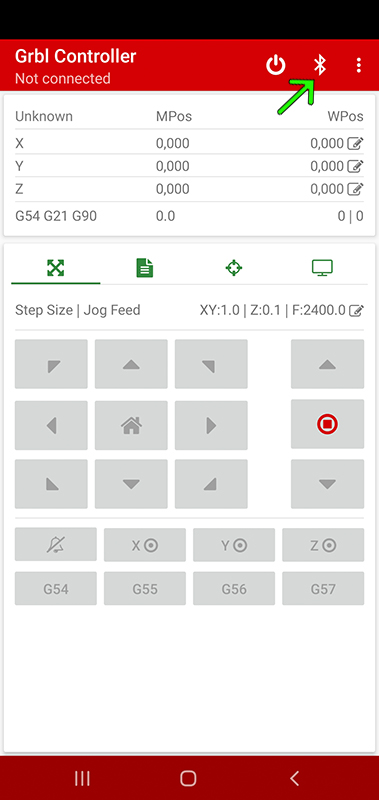
- On your Smartphone or tablet, go to Google Playstore, search for GRBL controller, install it and open it.
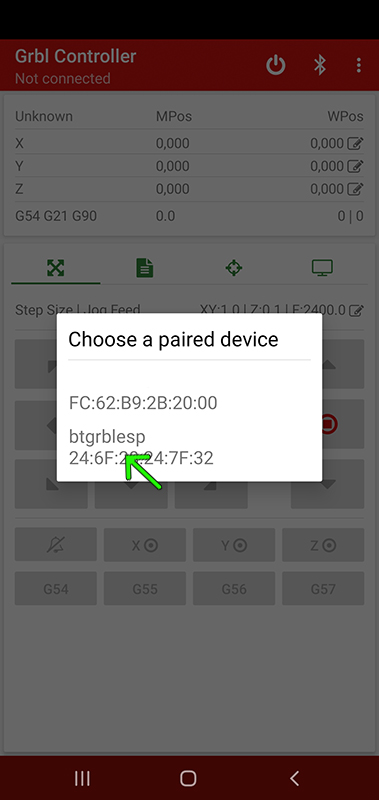
- Press the GRBL controller Bluetooth icon, select btgrblesp, it’s connected!
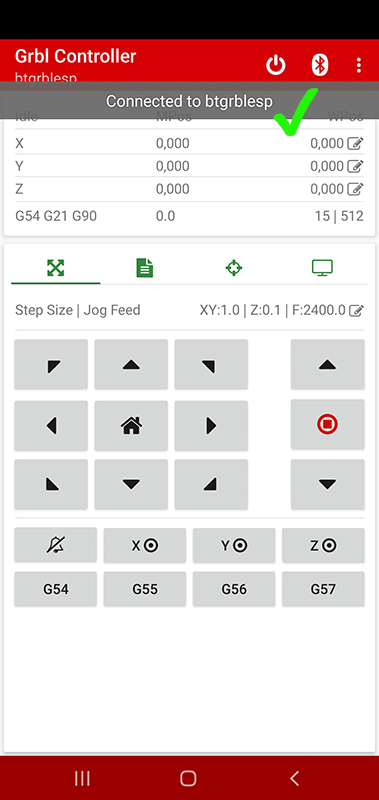
Now your CNC is managed by your smartphone!
Info: I don’t have an Iphone / Ipad so I can’t help you with these devices ^^ … but keep me posted so I can complete this section for Apple devices. Thank you
GRBL board/Computer by Wifi
You can connect the computer (or smartphone / tablet) to the GRBL board in wifi with two ways:
- via your internet box (STA Mode), for this, in the ESP3D tab of WebUI, in the Radio Mode box, put Client Station (you can also do this with the command $Radio/mode=STA from a serial console or via custom button on the TFT)
- By directly connecting your computer to the GRBL board (AP Mode) (which implies disconnecting from your internet box), for this, in the ESP3D tab of WebUI, in the Radio Mode box, put Access Point (you can also do this with the command $Radio/mode=AP from a serial console or via the personalized button of the TFT) (default password 12345678)
- Then, retrieve the IP address of the GRBL board by typing the command $i from a serial console (it usually looks like 192.168.x.xx)
- You want to control the CNC with WebUI, as seen on the GRBL settings page, all you have to do is enter the IP address of the GRBL board in the address bar of the web browser and the WebUI interface opens. (recommended because we have direct access with the SD card of the GRBL32bits board)
Carte GRBL/Écran tactile, par Bluetooth

Installation:
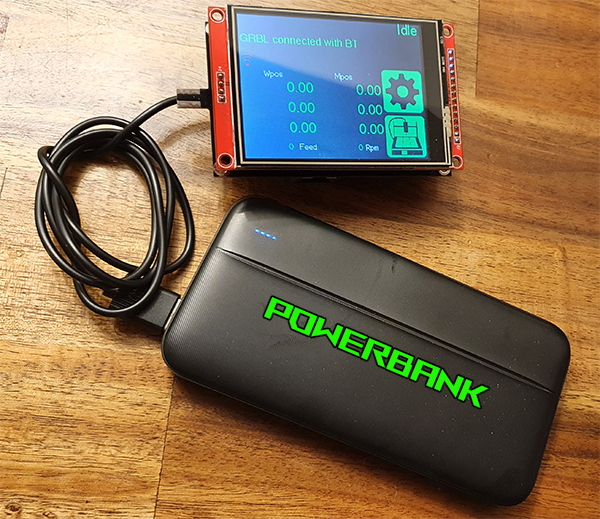
First, we need to power our touch screen ^^. There are three solutions for this:
- With the RJ45 cable connected to the GRBL board, it’s still physically connected, but it is possible to communicate in Bluetooth between the TFT and the GRBL card, this deactivates the serial communication between the two and allows to have in addition a computer connected by USB to GRBL and the TFT can be used simultaneously!
- Wireless, With a power bank directly plugged into the ESP32’s USB port. The power bank must provide a minimum output of 1A, which is the average consumption of the screen. We can therefore also calculate the theoretical autonomy, with a power bank of 10000mA/h, that gives us an autonomy of 10h.
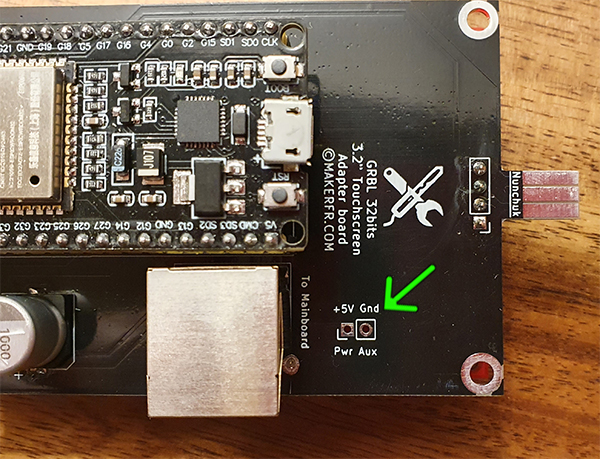
- Wireless, By connecting any 5V power supply delivering at least 1A to the PWR AUX pin header slot of the TFT board
Note: Do not supply 5V to the TFT card (ex 2 and 3) if it is connected to the GRBL board with the RJ45 cable!
Now that your Touchscreen is supplied with 5V, we will activate Bluetooth on the GRBL board:
- Under WebUI, go to ESP3D tab
- In the Radio mode box, select Bluetooth and restart (It is possible to do the same with the command $Radio/mode=BT from a serial console or via a custom button on the TFT)
Then we activate Bluetooth on the TFT:
- Go to the TFT settings

- COM button

- Press Bluetooth button
 , the search may take a few seconds.
 - It’s connected, the status of GRBL has changed from ?? to Idle, so it’s ready to use!

Info: the range of Bluetooth between the GRBL card and the TFT is approximately 5/6 meters
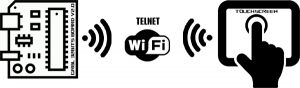
GRBL board/Touchscreen, by Telnet (WIFI)
Installation:
You must connect the GRBL board to your internet box (STA mode), if it’s not already done, in the ESP3D tab of WebUI, in the Radio Mode box, put Client Station (you can also do this with the command $Radio/mode=STA from a serial console or a custom button on the TFT)
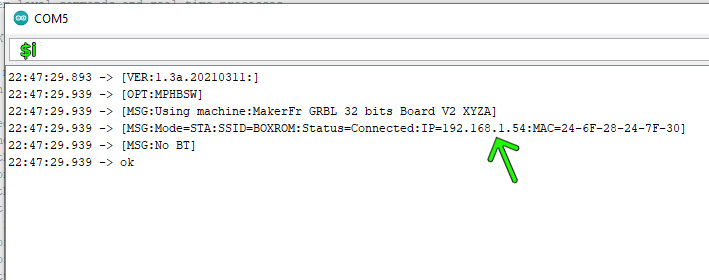
- Then, retrieve the IP address of the GRBL board by entering the command $i from a serial console (it looks like 192.168.x.xx)
Now we can activate the Telnet connection on the TFT:
- You have to enter the IP address of the GRBL board in the TFT firmware, for that, open the firmware of the TFT under Arduino, Config.h tab, enter the IP address of the GRBL board on this line and re-flash the TFT ESP32:

Then once the GRBL board and the TFT are switched on again :
- “Settings ” menu-> “Connections to GRBL ” submenu
- Press the “Telnet” button, the Telnet connection search starts, then connects, the GRBL state switches to “IDLE”, you are connected!
GRBL board/Computer, by Telnet(WIFI)

Installation:
You must connect the GRBL card to your internet box (STA mode), if it is not already done, in the ESP3D tab of WebUI, in the Radio Mode box, put Client Station (you can also do this with the command $Radio/mode =STA from a serial console or a custom button on the TFT)
- Then, retrieve the IP address of the GRBL board by entering the command $i from a serial console (it looks like 192.168.x.xx)
Now we can connect a GRBL compatible controller software (for example bCNC, …), for this:
- Open your software, go to the connection tab (File tab in bCNC)
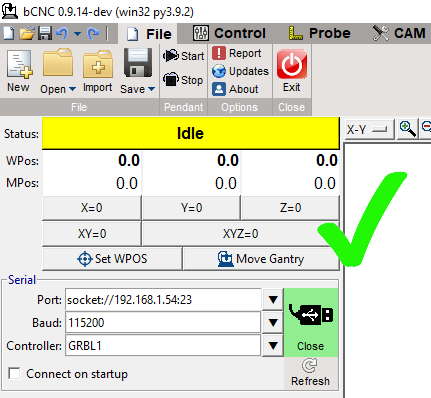
- In the port field, enter the IP address of your GRBL card in this format: socket://192.168.X.XX:23 and then click on the open button
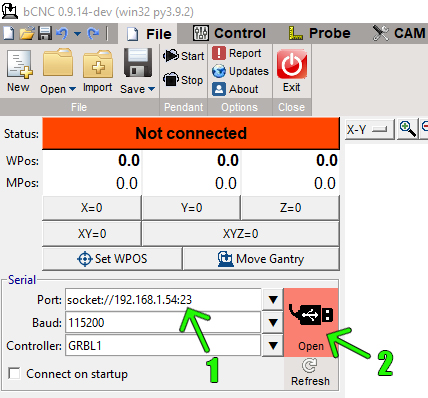
Info: Doesn’t work with Candle software
Info2: It’s not possible to have two telnet connections simultaneously, but it is possible to have a Telnet connection (which uses port 23) and at the same time use WebUI in wifi (which uses the port 80)
The different statuses of GRBL:
Idle : Means the machine is ready, all the lights are green
Not connected or ?? (on the touch screen): Means that the connection between the GRBL board and your terminal is not established, check your wiring and connection parameters.
Alarm: means that something has put GRBL in alarm, often it is the limit switches which have been touched, or the soft reset button which has been touched. To exit the alarm, press reset software button, and then, press the Unlock button on the touchscreen or the app you are using, or with the $ X command
Run: file currently playing
Hold: On pause
Jog: When moving the axes with the Nunchuk